Dust II
| Dust II | |
|---|---|
| Game Modes | — |
| Scenario | — |
| Teams | — |
Overview
Dust II is the most iconic map in Counter-Strike history, serving as the definitive competitive battleground since its introduction in 2001. Set in a Middle Eastern environment, the map features a straightforward three-lane layout that rewards both individual skill and team coordination. Its open sightlines and clean geometry make it a favorite for players who rely on raw aim.
In CS2, Dust II received visual upgrades with the Source 2 engine while preserving its classic layout. The map remains a staple in competitive play and is often the first map new players learn due to its intuitive design. The balance between T-side aggression through Long A and Mid control versus CT-side positional play makes Dust II one of the most evenly balanced maps in the active pool.
The map's simplicity is deceptive — high-level play on Dust II requires precise utility usage, strong communication, and the ability to win aim duels consistently. Professional teams frequently use Dust II as a skill-check map where the better-aiming team is expected to win.
Map Layout
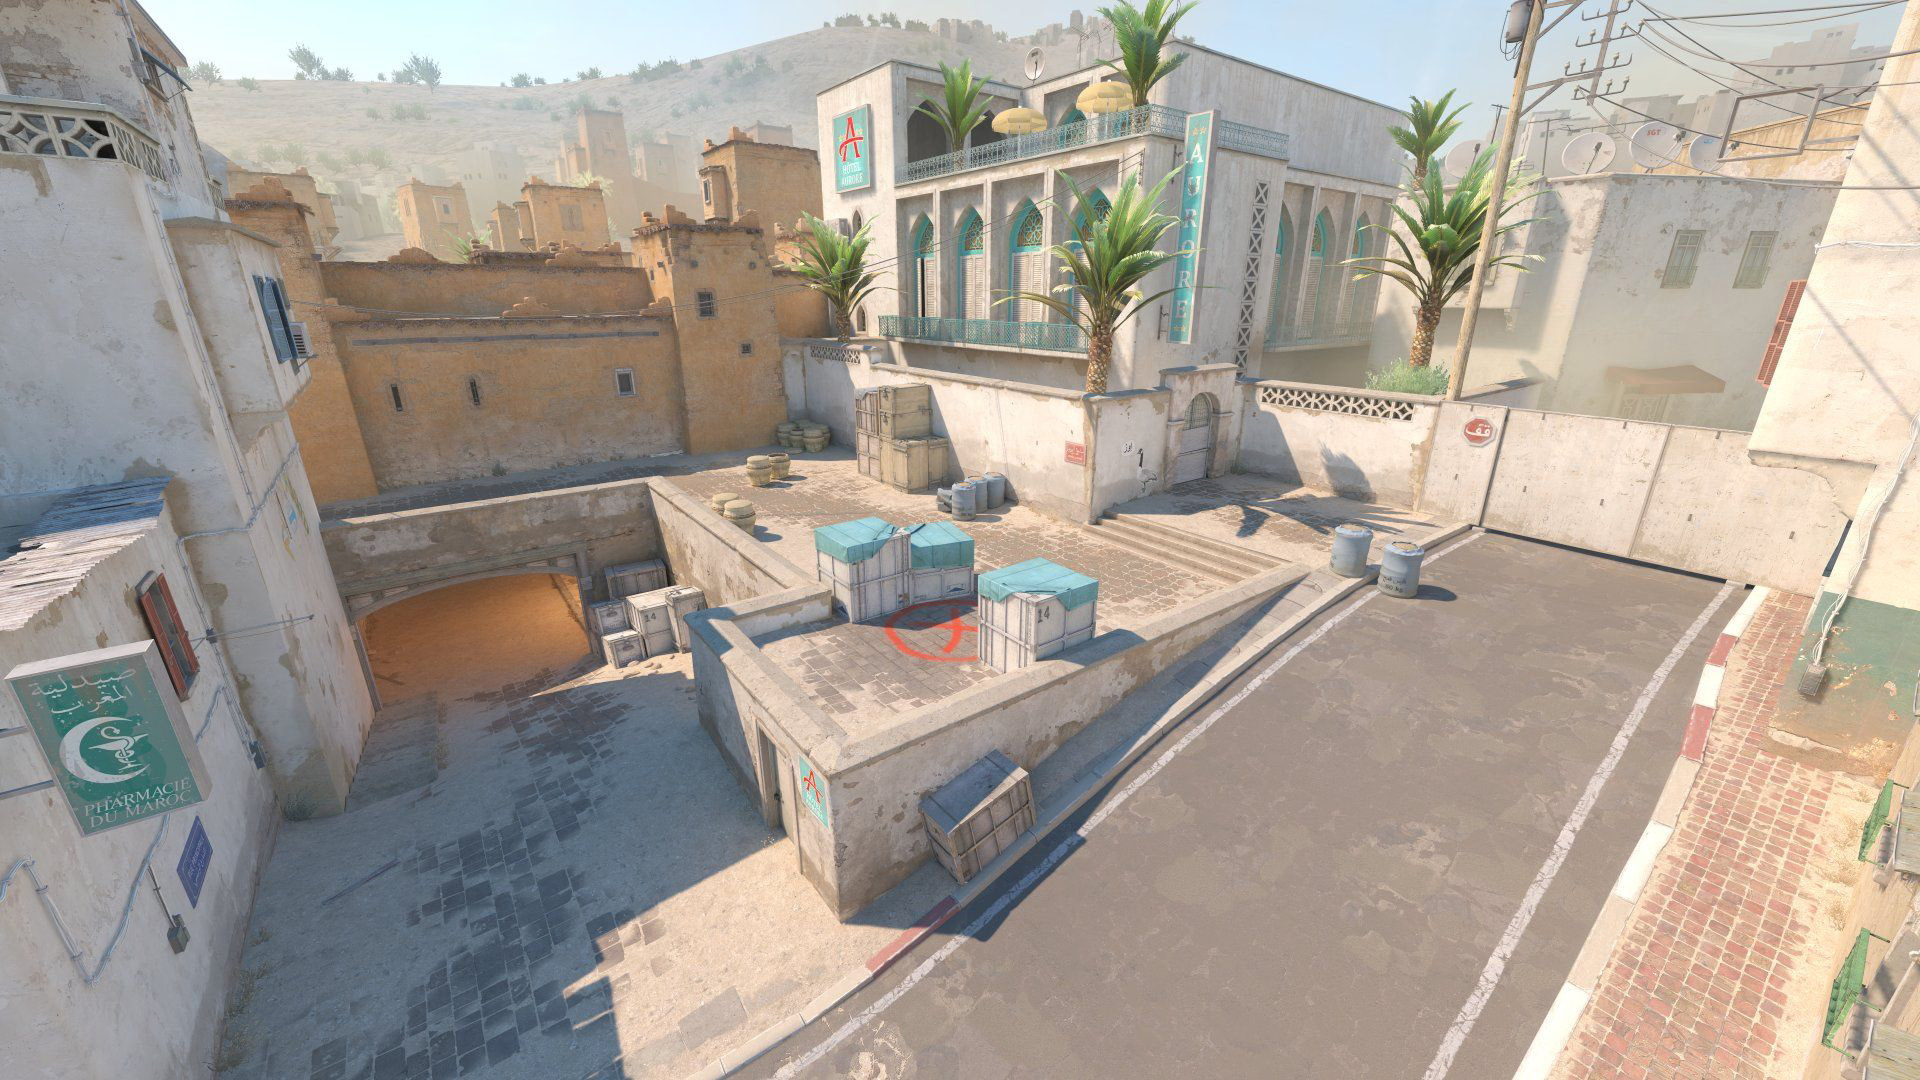
Bombsite A
Bombsite A is an open site accessible from Long A (through Long Doors and across the Long stretch) or from Short A (Catwalk). The site features the iconic A Platform where the bomb is typically planted, with an elevated position at Goose providing cover. CT players often hold from Car, the elevated Platform position, or from behind the site near CT Spawn. The site's openness makes retakes possible from multiple angles but also exposes defenders to crossfires.
Default plant positions include behind the box on the platform for Long A visibility, or in the open for Short/CT coverage. Afterplant positions for Terrorists include Goose, Long pit, Elevator, and Short corner.
Bombsite B
Bombsite B is accessed through the narrow B Tunnels, which open into the site through Upper and Lower Tunnels entrances. The site itself features the large platform area with the double stack boxes, Back Plat, and the window room. CT defenders typically play from Site, Window, Big Box, or hold aggressive angles in Tunnels. B site is generally considered easier to take but harder to hold due to its enclosed nature and the speed of CT rotations through CT Mid.
The most common plant spot is behind the big box for tunnel coverage. CTs rotating from A reach B through CT Spawn and the Back of B doors.
Mid
Mid connects T Spawn to both bombsites and is the strategic heart of Dust II. T players can push through Mid Doors to gain access to Short A (Catwalk), or peek through the gap in Mid Doors to challenge the CT AWPer. Mid control is critical for T-side executes, as it enables split attacks on both sites and threatens CT rotations.
CT players commonly hold Mid from the elevated CT Mid position or aggressively peek Mid Doors with an AWP. The Xbox box provides a boost position for reaching Short A quickly. Losing Mid control as a CT forces a passive playstyle and limits rotation options.
Callouts
| Area | Callout | Description |
|---|---|---|
| A Site | Long A / Long | The long corridor from T Spawn to A Site via Long Doors |
| A Site | Pit | The depressed area at the end of Long A, before the ramp up to A Site |
| A Site | Goose | The corner behind A Site with the graffiti, provides cover from Short |
| A Site | Short A / Cat | The Catwalk route from Mid to A Site |
| A Site | A Car | The car on A Site providing cover from Long |
| A Site | Elevator | The small area near A Site connecting to CT Spawn |
| Mid | Mid Doors / Suicide | The double doors in Mid that T players cross; "Suicide" refers to peeking the gap |
| Mid | Xbox | The box in Mid used for boosting to Short A |
| Mid | CT Mid | The elevated CT-side area overlooking Mid Doors |
| Mid | Palm | The palm tree area connecting CT Mid to B site rotations |
| B Site | B Tunnels / Upper B | The main tunnel approach to B Site |
| B Site | Lower Tunnels / Lower B | The lower path through B Tunnels connecting to Upper Tunnels |
| B Site | Big Box | The large double-stacked boxes on B Site |
| B Site | Window | The window room overlooking B Site from the CT side |
| B Site | Back Plat | The back platform area of B Site near the CT rotation door |
Strategy
T-Side Defaults
Long A Control: Two players push Long Doors with a flash, take control of Long, and set up for an A execute. One lurks Tunnels, one watches Mid, and one supports from Short. This default focuses on gaining map control before committing.
B Split: Three players push Upper and Lower B Tunnels simultaneously while two players create a Mid-to-Short diversion. A well-timed flash through Tunnels can overwhelm the typically one or two CT defenders on B.
Mid-to-B: Two players take Mid control through Mid Doors, one pushes through to CT Spawn while others hit B from Tunnels, creating a pinch on the B site defenders.
CT-Side Setups
Standard 1-1-2-1: One player holds Long A from Platform or Pit, one watches Mid from CT Mid, two anchor B from Site and Window, and one plays Short A with the option to rotate. This is the most balanced setup.
Aggressive Long: Push a player into Long Doors for early information or a kill, then fall back. This disrupts T-side Long A takes and forces them to use utility early.
B Stack: Three players stack B with one playing close in Tunnels for an early engagement. Works well against teams that favor B executes, but leaves A vulnerable.
Utility Guide
- A Site Smoke (Cross) — From outside Long Doors on the T side, aim at the top of the left wall near the corner and jump-throw. This lands a smoke cutting off the CT crossover from Short to Site.
- Xbox Smoke — From T Spawn near the right-side barrel, aim at the antenna above Mid Doors and throw. Blocks the CT AWP angle through Mid Doors.
- B Tunnels Flash — From Upper B Tunnels, face the right wall and throw a pop flash that blinds anyone holding the B Site entrance.
- Long A Flash — From behind Long Doors, right-click a flash off the right wall to blind any CT holding the Long corner or Pit.
- Short A Molotov — From Lower Mid after taking Mid control, aim above the Short A ledge and throw to clear any CT playing on Catwalk.
History
Dust II was created by David Johnston and first released in Counter-Strike 1.1 in March 2001. It quickly became the most-played map in the franchise, replacing the original Dust as the community favorite. The map's straightforward layout and balanced gameplay made it a tournament staple across every iteration of Counter-Strike.
The map received a major visual overhaul in CS:GO in 2017, updating its textures and models while preserving the classic layout. In CS2, Valve further upgraded Dust II with Source 2 lighting and materials, though it was notably absent from the initial CS2 competitive map pool before being reintroduced. Despite not always being in the active competitive rotation, Dust II remains the most recognizable Counter-Strike map worldwide.
Trivia
- Dust II is consistently the most-played map across all Counter-Strike titles, often representing 20-30% of all matchmaking games.
- The map was originally called "de_dust2" and was a sequel to David Johnston's original "de_dust" map.
- The iconic "Mid Doors" gap shot has been a defining element of Counter-Strike AWP play for over two decades.
- Dust II was one of the first maps to be fully remade for CS:GO, receiving new assets in the October 2017 update.
- The graffiti at Goose on A Site has been a recognizable landmark since the earliest versions of the map.